TL;DR
- A LiftMaster opener that reverses mid-close and blinks 10 times is telling you the safety-reversing sensors have a problem. Start there every time.
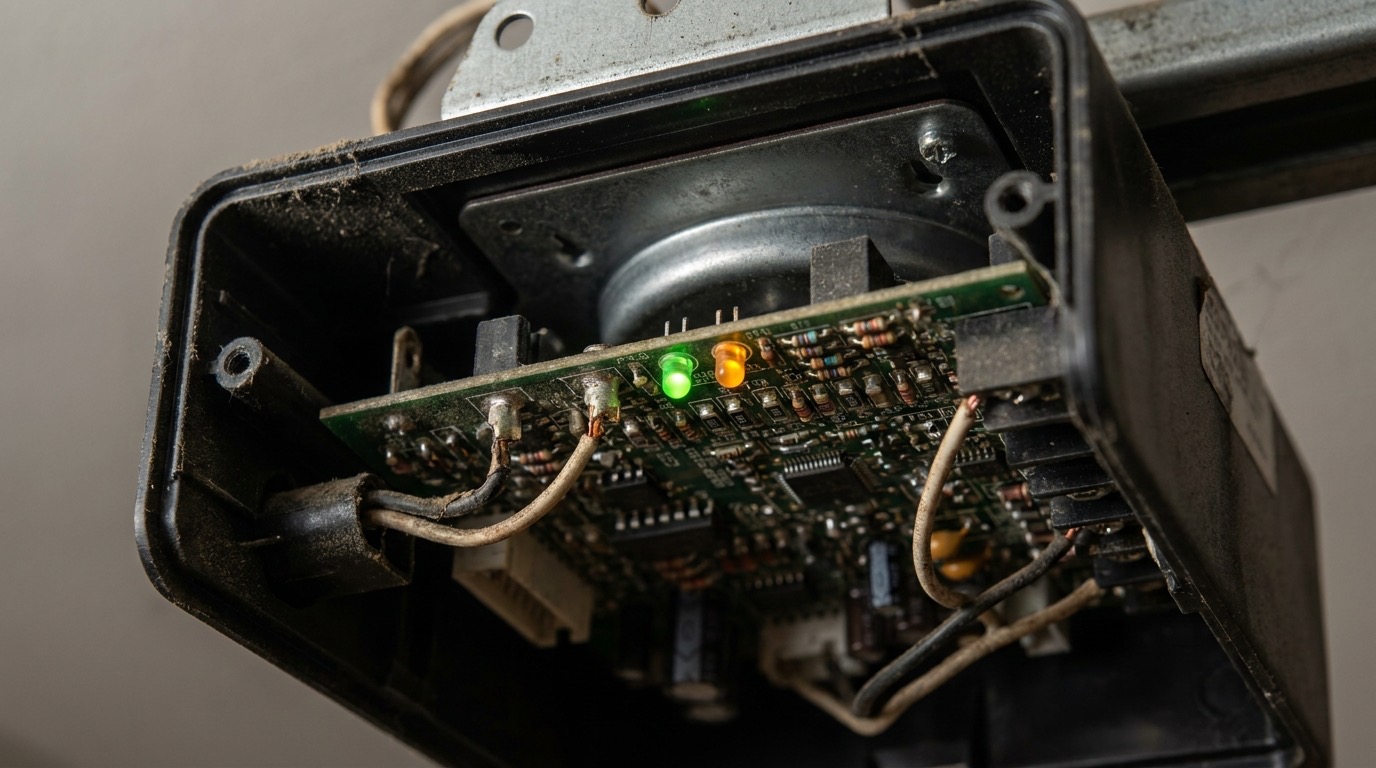
- The amber LED on one sensor should glow steady; the green LED on the other should glow steady. Blinking amber means misalignment or obstruction.
- Blink counts from 1 to 10 each mean a different fault. Match the count to the chart in this post.
- Sun glare on a south- or west-facing sensor is a real San Diego issue that mimics a broken sensor. Shade the receiver and test again.
- If the light blinks more than 5 times consistently and sensor fixes don’t help, the logic board may need replacement. Call for sensor repair or alignment rather than guessing at wiring.
You press the remote, the door starts down, reverses before it closes, and the opener light blinks a specific number of times. That blink count is the opener’s diagnostic code. LiftMaster garage door opener troubleshooting starts by counting those blinks precisely and matching them to the fault table. It’s faster than replacing parts at random, and most of the common faults take five minutes to fix yourself.
How the blink-code system works
LiftMaster openers built from roughly 1998 onward use the status LED on the motor unit to communicate faults. The door tries to close, fails, reverses, and then the light blinks a set number of times.
Count the blinks in the first burst only. Write the number down before you forget it.
Also check the small LEDs on the safety-reversing sensors at the bottom of the door tracks. One sensor sends the infrared beam; the other receives it. Both should glow steady when aligned and the path is clear.
The ten blink codes decoded
1 blink: sending-sensor wire fault
One flash usually points to a problem with the sensor wired to the sending unit (the one with the amber LED). Check where the sensor wire runs up the vertical track to the header and along the ceiling to the motor. Look for a staple that pierced the wire or a pinch point where the wire was pulled too tight. Cold winters in East County communities like Alpine or Ramona can crack the insulation on older wires, causing intermittent contact.
2 blinks: receiving-sensor wire fault
Two flashes mirror the 1-blink fault but on the receiving sensor (green LED side). Same wire-tracing process. A wet garage after a winter rain can cause a temporary short in exposed wiring that dries out and disappears, then returns next storm.
4 blinks: safety-reversing sensor misalignment
This is the most common code homeowners see. Both sensors are powered but the beam isn’t making a clean connection between them. The amber LED on the sending sensor will blink instead of glowing steady.
Fix sequence:
- Clear any object from the sensor path (a spider web counts).
- Check that both sensor brackets are pointed at each other, not angled up or down.
- Loosen the wing nut on each sensor bracket, align the sensor face straight across, and retighten while holding it in place.
- Watch the amber LED. It should go from blinking to solid within a few seconds of correct alignment.
- Try the door. If it closes cleanly, you’re done.
5 blinks: logic board fault
Five flashes mean the opener’s control board detected an internal fault. Sometimes this is a one-time glitch. Unplug the opener for 30 seconds, then plug it back in and try. If 5 blinks return immediately, the logic board has a persistent problem. This is not a DIY repair.
10 blinks: safety-reversing sensor out of alignment or obstructed
Ten flashes is the most dramatic: the opener tried to close, something caused the safety-reversing system to trip, and the door reversed hard. This is the opener working exactly as designed. It stops the door from closing on a person or object.
Ten blinks almost always trace back to:
- A clear but obstructed sensor path (cardboard leaning near the sensor, a bike tire, a garden hose)
- Severe misalignment (the sensor bracket was bumped, bent, or knocked by a lawn mower)
- Sun glare directly hitting the receiving sensor in the late afternoon (common on west- or south-facing garages in Chula Vista, El Cajon, and Poway between 2 and 5 p.m.)
- A broken wire that only fails under vibration
The sun-glare fix is straightforward: cut a short section of cardboard and tape it above the sensor as a sun shade. Test the door. If it closes cleanly, the glare was the culprit. Many San Diego homeowners chase a wiring or alignment problem that’s actually just afternoon sun.
How to fix sensor misalignment in five steps
This fixes the 4-blink and 10-blink codes in most cases:
- Look at the amber LED (sending sensor). If it’s blinking, the sensors are misaligned. If it’s dark, there may be a wiring or power issue.
- Remove any object between the two sensors.
- Loosen the mounting wing nut on the sensor that’s blinking and swivel it until the amber light goes steady.
- Hold it steady and tighten the wing nut without letting the bracket shift.
- Confirm the green LED on the receiving sensor is also steady, then test the door.
If the amber LED still blinks after alignment with nothing in the path, the sensor itself may be failing. Sensors run $20–$40 for a replacement pair but need to be wired correctly. Book sensor repair and alignment if the DIY steps don’t hold.
When the problem isn’t the sensors
If both LEDs are steady and the door still won’t close, or the blink count is 5, the problem is upstream of the sensors.
Up/down arrow LEDs and the learn button
Newer LiftMaster models (850LM, 8550W, and similar) have a separate diagnostic display using the up and down arrow button LEDs. These blink independently from the main light. A pattern like “up arrow 2 blinks, down arrow 3 blinks” maps to a different fault table in the owner’s manual. Download your model’s manual from LiftMaster’s site and look for the LED diagnostic chart by model number.
The logic board
If multiple fault codes appear over a short period, or the opener behaves erratically (closes on its own, won’t respond to any input, blinks without a pattern), the logic board is the likely cause. Logic board replacement runs $120–$250 in parts plus labor. On an opener over 12 years old, replacing the whole unit is often the better call. See the garage door opener installation cost guide to compare.
A full garage door opener repair or replacement call from a tech includes a diagnostic on the board, sensors, and wiring in one visit.
San Diego-specific sensor problems
Coastal salt air in La Jolla, Del Mar, Coronado, and Encinitas leaves a thin film on sensor lenses that can block the infrared beam intermittently. Wipe both lenses with a clean dry cloth before diagnosing anything else.
Inland East County (Lakeside, Santee, Alpine) sees more temperature swings. Cold nights crack the original wire insulation. If your door works fine in summer but shows sensor faults December through February, check the wire condition along both vertical tracks.
Canyon-adjacent neighborhoods collect dust and cobwebs faster than most. A spider web across the sensor path is genuinely one of the most common service calls. Check it before calling anyone.
Frequently asked questions
Why does my LiftMaster reverse right before the door fully closes?
The door is detecting a blocked sensor or a limit-switch problem just before the fully-closed position. Most often it’s a sensor alignment issue or debris near the sensor. Work through the alignment steps above. If the reversal happens every time with nothing visible in the path, the close-limit setting may need adjustment at the motor unit.
The wall button works but my remote doesn’t. Is that a sensor problem?
No. If the wall button operates the door normally, the sensors are fine. A remote that doesn’t work while the wall button does points to a dead remote battery, a remote that needs to be reprogrammed, or antenna interference. See the garage door remote troubleshooting guide for that fault path.
My LiftMaster blinks but then closes on its own a few minutes later. What’s happening?
Intermittent faults usually mean sun glare at a specific time of day, vibration disrupting a loose wire connection, or a temperature-related crack in the wire insulation. Try operating the door at different times of day to narrow it down. Intermittent faults are harder to catch remotely, and a tech visit is the fastest resolution.
How long do LiftMaster safety sensors last?
The sensors themselves last 10–15 years under normal conditions. The wiring is the more common failure point, especially in garages that experience temperature swings or coastal humidity. If your opener is over 12 years old and you’re chasing sensor codes, the opener lifespan guide can help you decide whether repair or replacement makes more sense.
If the blink codes aren’t clearing after sensor alignment, read the full won’t-close troubleshooting guide and the sensor problems breakdown for deeper diagnosis. Both cover edge cases that go beyond the standard alignment fix.
Still blinking? Call Lift Pro SD at (858) 925-5546. The pros in our network carry replacement sensor pairs and logic boards on the truck. Most sensor calls wrap up in under an hour. Same-day service across San Diego County including Escondido, La Mesa, and Chula Vista.