TL;DR
- Garage door opener programming always starts at the Learn button on the motor unit. Location and color vary by brand.
- LiftMaster/Chamberlain: purple, yellow, or green Learn button. Genie: red or blue. Each color means a different rolling-code protocol.
- Remote programming: press Learn, release, then press the remote button within 30 seconds.
- Keypad programming: press Learn on the opener, enter your chosen PIN on the keypad, then press the keypad’s Enter or Send button.
- After moving into a home, always erase all codes first. You have no idea who has a working remote.
- If programming fails repeatedly or the Learn button doesn’t respond, the logic board may need replacement. That’s a tech call, not a DIY one. Remote and keypad programming service covers it.
New remote, new keypad, just moved in, or bought a car with HomeLink in the mirror. Whatever the reason, garage door opener programming is the same basic sequence on almost every residential opener built after 1993: find the Learn button, press it, tell the device to pair, done. The differences between brands come down to button color, timing, and a few extra steps for keypads.
Here’s how to do all of it, brand by brand.
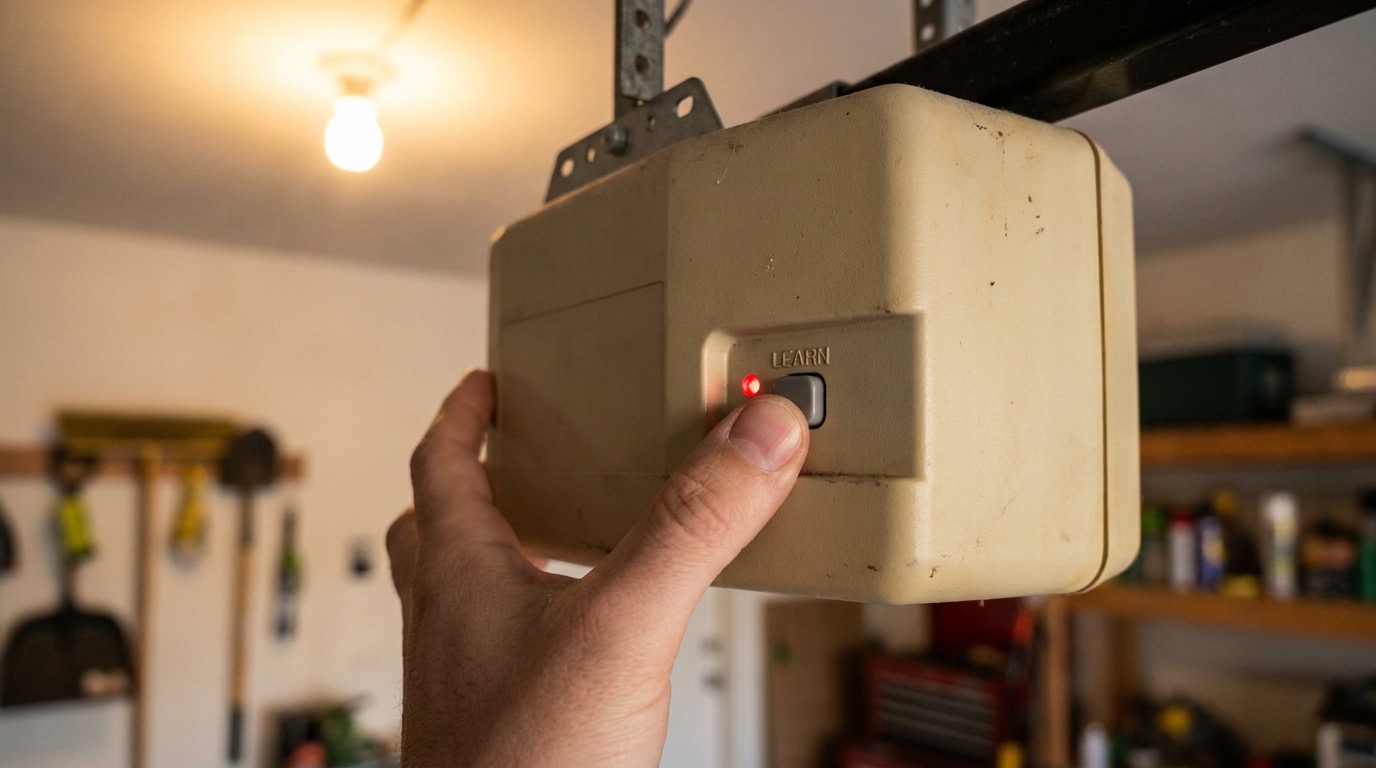
Finding the Learn button
The Learn button is on the motor unit, the box mounted to your garage ceiling on the rail. Remove the light cover if there is one, or check the back or side panel of the housing.
LiftMaster and Chamberlain
LiftMaster and Chamberlain share the same programming logic (same parent company, The Chamberlain Group).
- Yellow Learn button: older units, roughly 1997–2005. Security+ rolling code.
- Purple Learn button: mid-generation units, Security+ 2.0. Most common in San Diego homes built 2005–2015.
- Green or orange Learn button: newer myQ-compatible units. Same basic programming, but these also sync with the myQ smartphone app.
Button color determines remote compatibility. A purple-button opener needs a purple-compatible remote. Mismatched units won’t pair no matter how many tries.
Genie
Genie uses a red or blue Learn button. Its rolling-code system is called Intellicode. Same principle: press to enter pairing mode, then trigger the device within the window.
Other brands
Craftsman openers made before 2012 were manufactured by Chamberlain and use the same Learn button. Older Sears units from the 1990s use a DIP-switch fixed code. If your remote has a row of tiny numbered switches, set both the remote and the motor unit to the same switch pattern.
Programming a new remote
About 60 seconds once you’re in front of the opener.
- Press and release the Learn button. A small light comes on or blinks.
- Within 30 seconds, press and hold the button on the remote you want to pair. Hold until the opener’s light blinks once (LiftMaster) or the opener clicks twice (Genie). Release.
- Press the remote button once more to confirm. The opener should activate briefly.
If nothing happens after two tries, check remote compatibility with your opener’s Learn button color. If the opener flashes rapidly or makes an error sound, the memory may be full. Most openers store 40 codes. See the erasing section below.
Programming a wireless keypad
Exterior keypads let you open the door without a remote. They’re useful for kids, cleaners, or anyone who needs access without a car. Remote and keypad programming covers keypads that won’t sync, but most new keypad installs are a straightforward DIY job.
LiftMaster/Chamberlain keypad
- Press and release the Learn button on the opener.
- Within 30 seconds, go to the keypad and enter a 4-digit PIN of your choice.
- Press and hold the Enter button until the opener’s lights blink twice.
- Test the PIN.
Some mid-generation Chamberlain keypads use a two-trip sequence: press Program on the keypad, enter the PIN, press Enter, then go to the opener, press Learn, return to the keypad, and press Enter again.
Genie keypad
- Press # on the keypad, enter a 4-digit PIN, press # again.
- Within 30 seconds, press the Learn button on the opener.
- Return to the keypad within 30 seconds and press # to confirm. The opener activates.
Changing the PIN later
Most keypads let you change the PIN from the keypad itself without going back to the opener. Steps are in the manual, usually behind the battery cover.
Syncing to HomeLink in your car
HomeLink is the built-in garage system in the sun visor or mirror of many cars (Toyota, Honda, Ford, GM, Subaru, BMW). Syncing to a modern rolling-code opener takes two trips.
- In the car, hold two outer HomeLink buttons until the light blinks slowly, then rapidly. Release. This clears old programming.
- Hold your existing remote up to the HomeLink unit (within 1–3 inches). Press and hold both the HomeLink button you want to program and the remote button at the same time. Hold until the HomeLink indicator changes from slow blink to rapid blink or solid. Release both.
- Go to the opener and press the Learn button.
- Within 30 seconds, return to the car. Press the HomeLink button, hold 2 seconds, release, hold again 2 seconds. Repeat up to 3 times until the opener activates.
Step 4 completes the rolling-code handshake. Without it, HomeLink sends a fixed signal that most modern openers won’t accept. Older Honda Civics and some 2003–2012 model years need a HomeLink compatibility bridge kit (about $40, Chamberlain makes one) because the car’s HomeLink hardware predates rolling-code pairing.
Erasing all codes when you move in
If you’ve just moved into a home, the previous owners (and anyone they gave remotes to) can still open your garage until you erase the codes and re-pair only your own devices.
This is especially worth doing in higher-density areas: Chula Vista, La Mesa, and National City have older housing stock where this step often gets skipped. One erase takes 5 seconds.
To erase all codes on LiftMaster/Chamberlain: press and hold the Learn button for 6–10 seconds until the indicator light goes out. All paired remotes, keypads, and HomeLink entries are erased. You’ll need to re-pair everything from scratch.
To erase on Genie: press and hold the Learn button for about 10 seconds until the unit beeps three times or the light goes out.
After erasing, program your own remotes and keypad before using the door. Pair one device at a time to confirm each one works.
Rolling codes: what they are and why they matter
Older openers (pre-1993) used fixed DIP-switch codes. Any universal remote matching the same DIP pattern could open your garage. Modern openers use rolling codes: the opener and remote both advance to the next code in a synchronized sequence of billions after every press. A code captured in the air is already stale.
That’s why programming requires physical access to the Learn button. The opener and the remote need to sync at the same starting point. There’s no way to do it remotely.
If your opener is over 15 years old and you’re in an area with more vehicle break-ins (some parts of El Cajon and Spring Valley), upgrading to a modern rolling-code unit is worth considering. The smart garage door opener options available today include built-in rolling code, battery backup, and smartphone monitoring.
When programming just doesn’t work
Three things cause programming to fail after multiple correct attempts:
- Incompatible remote. Opener’s Learn button color and remote’s frequency spec don’t match. Buy a remote specifically listed for your opener model.
- Full memory. Most openers store 40 codes. If the memory is full, new pairings won’t save. Erase all codes and start fresh.
- Failed logic board. If the Learn button light doesn’t come on when pressed, or the opener doesn’t respond at all during the pairing window, the circuit board inside the motor unit may have failed. That’s past DIY territory.
For logic board failures, burned-out Learn button circuits, or keypads that won’t sync after multiple correct attempts, the pros in our network handle remote and keypad programming as a standalone service call.
Frequently asked questions
How do I know which Learn button color my opener has?
Remove the light cover on the motor unit or check the back or side panel. If the button isn’t labeled, look up the model number (on a sticker on the housing) on the manufacturer’s support site. The color is tied to the model line.
Why won’t my car’s HomeLink sync with my garage opener?
The most common reason is skipping the two-press handshake at the opener’s Learn button. HomeLink can train on a remote’s signal from inside the car, but rolling-code pairing requires that final step at the opener. If you’ve done both and it still won’t work, check whether your vehicle needs a HomeLink compatibility bridge. Some 2001–2010 model years do.
Can I program a remote to two different openers?
Yes. Multi-code remotes (most 3- or 4-button units) store a different code on each button. Press Learn on the first opener, press button 1 on the remote. Then press Learn on the second opener, press button 2. Each button operates its paired opener independently.
How do I program a garage door opener without the Learn button?
You can’t, on modern rolling-code openers. The Learn button is the physical security requirement. If it’s damaged or the logic board is dead, the opener needs a board swap or full replacement. Call (858) 925-5546 and a tech can assess whether it’s a board repair or a full opener installation.
If the remote programming worked but the opener itself is the problem, see the garage door opener troubleshooting guide for all nine failure modes. And if you’re deciding whether to repair or replace an older unit, the opener lifespan guide covers the decision clearly.
Can’t get it to pair and need it working today? Call Lift Pro SD at (858) 925-5546. The pros in our network cover remote and keypad programming and same-day opener service across all of San Diego County, including Carlsbad, Vista, and Oceanside.